Question
You are the network security administrator for Big Money Bank Co. You are informed that an attacker has performed a CAM table overflow attack by sending spoofed MAC addresses on one of the switch ports. The attacker has since been identified and escorted out of the campus. You now need to take action to configure the switch port to protect against this kind of attack in the future.
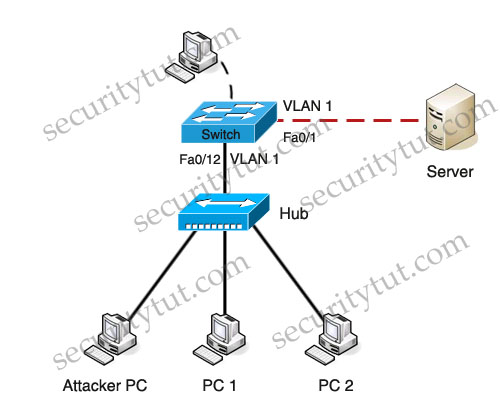
For purposes of this test, the attacker was connected via a hub to the Fa0/12 interface of the switch. The topology is provided for your use. The enable password of the switch is cisco. Your task is to configure the Fa0/12 interface on the switch to limit the maximum number of MAC addresses that are allowed to access the port to two and to shutdown the interface when there is a violation.
Answer and Explanation
The purpose of this sim is straightforward:
- Limit the maximum number of MAC addresses that are allowed to access the port to two.
- Shutdown the interface when there is a violation.
Please remember that we have to access interface Fa0/12 to fulfill the requirements. Before making any configuration, we should use the show running-config to check the status of interface Fa0/12
Switch>enable
Password: cisco
Password: cisco
Switch#show running-config
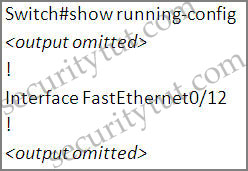
The interface Fa0/12 hasn’t been configured with anything.
Switch#configure terminal
Switch(config)#interface fa0/12
Switch(config-if)#switchport mode access
Switch(config)#interface fa0/12
Switch(config-if)#switchport mode access
First, enable the “port security” feature on this interface:
Switch(config-if)#switchport port-security
Set the maximum number of secure MAC addresses for this interface to 2:
Switch(config-if)#switchport port-security maximum 2
Shutdown if the security is violated:
Switch(config-if)#switchport port-security violation shutdown
Switch(config-if)#no shutdown
Switch(config-if)#end
Switch(config-if)#no shutdown
Switch(config-if)#end
Now you should check if the configuration is correct or not by typing the command show port-security interface fa0/12
Switch#show port-security interface fa0/12
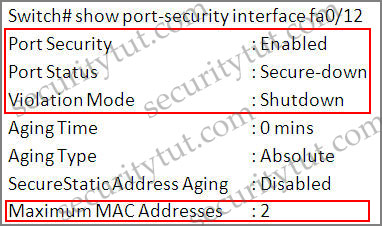
Notice that the parameters should be like this:
+ Port Security: Enabled
+ Violation Mode: Shutdown
+ Maximum MAC Address: 2
+ Port Security: Enabled
+ Violation Mode: Shutdown
+ Maximum MAC Address: 2
Save the configuration
Switch#copy running-config startup-config
Switch#copy running-config startup-config
Just for your information, when the security is violated the port is in the error-disabled state. We can bring it out of this state by entering the “errdisable recovery cause psecure-violation” global configuration command or we can manually re-enable it by entering the “shutdown” and “no shutdown” commands in the interface configuration.
- Lab A: Configuring ASA Basic Settings and Firewall Using CLIPart 1: Lab Setup
Part 2: Accessing the ASA Console and Using CLI Setup Mode to Configure Basic Settings
Part 3: Configuring Basic ASA Settings and Interface Security Levels Using CLI
Part 4: Configuring Routing, Address Translation, and Inspection Policy Using CLI
Part 5: Configuring DHCP, AAA, and SSH
Part 6: Configuring a DMZ, Static NAT, and ACLsLab B: Configuring ASA Basic Settings and Firewall Using ASDMPart 1: Lab Setup
Part 2: Accessing the ASA Console and ASDM
Part 3: Configuring ASA Settings and Firewall Using the ASDM Startup Wizard
Part 4: Configuring ASA Settings from the ASDM Configuration Menu
Part 5: Configuring a DMZ, Static NAT, and ACLsLab C: Configuring Clientless and AnyConnect Remote Access SSL VPNs Using ASDMPart 1: Lab Setup
Part 2: Access the ASA Console and Prepare for VPN Configuration
Part 3: Configuring Clientless SSL VPN Remote Access Using ASDM
Part 4: Configuring AnyConnect Client SSL VPN Remote Access Using ASDMLab D: Configuring a Site-to-Site IPsec VPN Using CCP and ASDMPart 1: Basic Router/Switch/PC Configuration
Part 2: Basic ASA Configuration
Part 3: Configuring the ISR as a Site-to-Site IPsec VPN Endpoint Using CCP
Part 4: Configuring the ASA as a Site-to-Site IPsec VPN Endpoint Using ASDM - CCNP SecurityOctober 29th, 2012http://vigorvids.com/videos/75/ASA-Firewall-Tutorials/most_recent/all_time/
Lab A: Configuring ASA Basic Settings and Firewall Using CLIPart 1: Lab Setup
Part 2: Accessing the ASA Console and Using CLI Setup Mode to Configure Basic Settings
Part 3: Configuring Basic ASA Settings and Interface Security Levels Using CLI
Part 4: Configuring Routing, Address Translation, and Inspection Policy Using CLI
Part 5: Configuring DHCP, AAA, and SSH
Part 6: Configuring a DMZ, Static NAT, and ACLsLab B: Configuring ASA Basic Settings and Firewall Using ASDMPart 1: Lab Setup
Part 2: Accessing the ASA Console and ASDM
Part 3: Configuring ASA Settings and Firewall Using the ASDM Startup Wizard
Part 4: Configuring ASA Settings from the ASDM Configuration Menu
Part 5: Configuring a DMZ, Static NAT, and ACLsLab C: Configuring Clientless and AnyConnect Remote Access SSL VPNs Using ASDMPart 1: Lab Setup
Part 2: Access the ASA Console and Prepare for VPN Configuration
Part 3: Configuring Clientless SSL VPN Remote Access Using ASDM
Part 4: Configuring AnyConnect Client SSL VPN Remote Access Using ASDMLab D: Configuring a Site-to-Site IPsec VPN Using CCP and ASDMPart 1: Basic Router/Switch/PC Configuration
Part 2: Basic ASA Configuration
Part 3: Configuring the ISR as a Site-to-Site IPsec VPN Endpoint Using CCP
Part 4: Configuring the ASA as a Site-to-Site IPsec VPN Endpoint Using ASDM
Post a Comment